
If you need a quick snack that feels homemade and satisfying, these Easy No-Bake Protein Balls are a great option. They bring together chocolate, peanut butter, and a soft chewy texture in a way that works for busy days, after-school hunger, or a simple sweet bite.
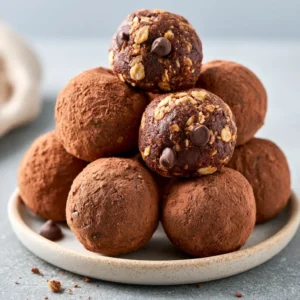
Protein Balls
Ingredients
- 1 cup rolled oats
- 0.5 cup peanut butter
- 0.5 cup protein powder
- 2 tbsp cocoa powder
- 2 tbsp honey or maple syrup
- 2 tbsp milk or non-dairy milk if needed
- 2 tbsp mini chocolate chips optional
- 1 pinch salt
Instructions
- In a medium bowl, combine the oats, protein powder, cocoa powder, and salt. Stir well so the chocolate flavor is evenly distributed.
- Add the peanut butter and honey or maple syrup. Mix until the ingredients start to clump together. If the dough looks too thick or crumbly, add a little milk.
- Stir in mini chocolate chips if you want a little extra sweetness in every bite. Keep the mixture thick enough to roll, but soft enough to hold together.
- Scoop out small portions and roll them between your palms into bite-size balls. Place them on a plate or parchment-lined tray.
- Refrigerate the protein balls for about 20 to 30 minutes so they firm up. After that, they are ready to eat.
Notes
Why You’ll Love This Protein Balls
These little bites are easy to mix, require no oven, and come together with simple pantry ingredients. They are also easy to customize, so you can keep them classic or adjust the texture and sweetness to match what you like best.
Protein Balls Ingredients & Substitutions
- Rolled oats, the base that gives the balls structure and a hearty texture.
- Peanut butter, for richness and that classic chocolate peanut butter flavor.
- Protein powder, to add extra staying power and boost the snack factor.
- Cocoa powder, for a deep chocolate taste.
- Honey or maple syrup, to help bind everything together and add gentle sweetness.
- Milk or a non-dairy milk, just enough to bring the mixture together if needed.
- Mini chocolate chips, optional, for extra chocolatey bites.
- Pinch of salt, to brighten the flavor.
If you need a swap, almond butter or sunflower seed butter can replace peanut butter. Oat flour can stand in for some of the oats if you want a finer texture. If your mixture feels dry, add a splash more milk, one teaspoon at a time.
Step-by-Step Instructions to Make Protein Balls
Step 1: Mix the dry ingredients
In a medium bowl, combine the oats, protein powder, cocoa powder, and salt. Stir well so the chocolate flavor is evenly distributed.
Step 2: Add the wet ingredients
Add the peanut butter and honey or maple syrup. Mix until the ingredients start to clump together. If the dough looks too thick or crumbly, add a little milk.
Step 3: Fold in extras
Stir in mini chocolate chips if you want a little extra sweetness in every bite. Keep the mixture thick enough to roll, but soft enough to hold together.
Step 4: Roll into balls
Scoop out small portions and roll them between your palms into bite-size balls. Place them on a plate or parchment-lined tray.
Step 5: Chill and enjoy
Refrigerate the protein balls for about 20 to 30 minutes so they firm up. After that, they are ready to eat.
Tips for Success
Use a creamy nut butter for the smoothest texture. If the mixture sticks to your hands, lightly dampen your palms before rolling. For a firmer snack, chill the mixture before shaping, then chill again after rolling.
Variations of Protein Balls
Try adding shredded coconut for a different texture, chopped nuts for crunch, or a spoonful of chia seeds for extra heft. You can also swap the cocoa powder for cinnamon if you want a softer, warmer flavor. If you like a sweeter bite, add a few more chocolate chips or a touch more honey.
Serving Suggestions: What to Pair with Protein Balls
These make a nice quick snack with fruit, yogurt, or a glass of milk. They also work well tucked into lunchboxes, served after a workout, or set out with coffee or tea for an easy afternoon treat.
Storage & Reheating Instructions
Store the protein balls in an airtight container in the refrigerator for up to one week. For longer storage, freeze them in a single layer, then transfer to a freezer bag or container for up to three months. No reheating is needed, just let them sit at room temperature for a few minutes if they are very cold from the fridge or freezer.
Memories Made Around the Table
There is something comforting about recipes like this, the kind you can mix together in a few minutes and share without much fuss. I love how they invite little hands into the kitchen and make snack time feel a little more special.
FAQs
Can I make these without protein powder?
Yes, you can leave it out and add a little more oats or oat flour until the mixture holds together. The texture will be slightly different, but still delicious.
Why are my protein balls too dry?
If the mixture feels dry, add a small splash of milk or a bit more peanut butter. Mix gradually so you do not overdo it.
Can I make these ahead of time?
Absolutely. They keep well in the fridge and are great for meal prep, snacks, or quick grab-and-go bites.
Do I have to use chocolate chips?
No, they are optional. The balls are still flavorful without them, especially if you enjoy a more simple chocolate peanut butter taste.
Final Thoughts
These Easy No-Bake Protein Balls are one of those reliable recipes that fit into real life. They are quick, flexible, and satisfying, which makes them easy to come back to whenever you need a simple snack that tastes homemade.