
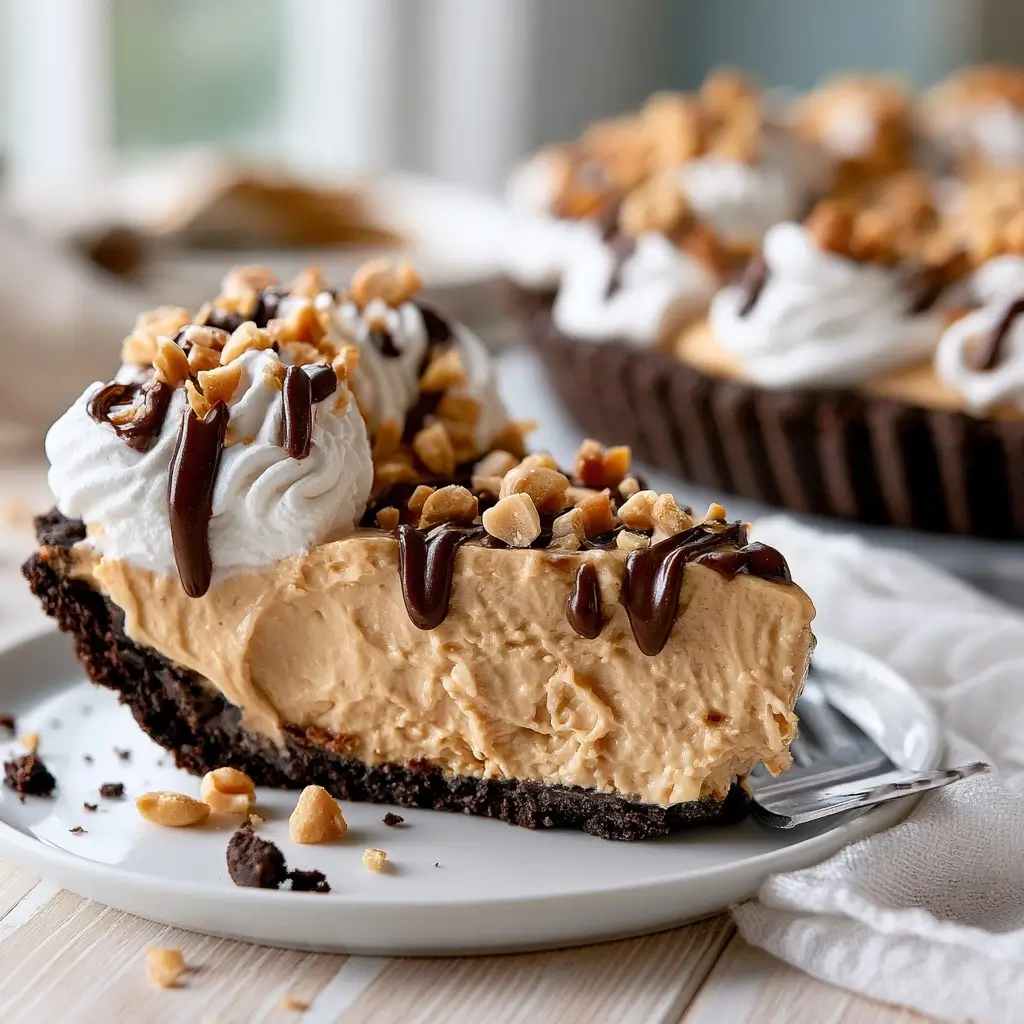
This dreamy no-bake peanut butter pie is the kind of dessert that feels made for sunny picnic days and easy gatherings. It has a creamy filling, a sweet cookie crust, and just the right amount of peanut butter flavor to keep everyone coming back for another slice.
No-Bake Peanut Butter Pie
Equipment
- 1 Pie Dish
- 1 Mixing Bowl
- 1 Electric Mixer
Ingredients
Crust
- 2 cups chocolate cookie crumbs
- 6 tbsp butter melted
Filling
- 8 oz cream cheese softened
- 1 cup creamy peanut butter
- 1 cup powdered sugar
- 1 tsp alcohol-free vanilla extract
- 8 oz whipped topping thawed
- 2 tbsp milk if needed to loosen the filling
Topping
- Chocolate shavings or chopped peanuts for topping
Instructions
- Combine the chocolate cookie crumbs with the melted butter until the mixture looks like damp sand. Press it firmly into the bottom and sides of a pie dish, then chill while you make the filling.
- In a large bowl, beat the cream cheese until smooth. Add the peanut butter, powdered sugar, and alcohol-free vanilla extract, then mix until creamy and well blended.
- Gently fold the whipped topping into the peanut butter mixture until the filling is light and fluffy. If it seems too thick, add a small splash of milk to loosen it slightly.
- Spoon the filling into the prepared crust and smooth the top. Cover the pie and chill it for at least 4 hours, or until fully set.
- Just before serving, top the pie with chocolate shavings, chopped peanuts, or another garnish you love. Slice and enjoy cold.
Notes
Why You’ll Love This No-Bake Peanut Butter Pie
This pie is rich, smooth, and wonderfully simple to make. Since it does not need the oven, it is a great make-ahead dessert for warm weather, potlucks, and busy weekends.
You will also love how flexible it is. The filling comes together quickly, the crust can be prepared in advance, and the finished pie holds beautifully after chilling.
No-Bake Peanut Butter Pie Ingredients & Substitutions
Here is what you will need to make this pie, plus a few easy swaps if needed.
- Chocolate cookie crumbs, for the crust
- Butter, melted, to bind the crust
- Cream cheese, softened
- Creamy peanut butter
- Powdered sugar
- Alcohol-free vanilla extract
- Whipped topping, thawed
- Milk, if needed for loosening the filling
- Chocolate shavings or chopped peanuts, for topping
Substitutions: You can use graham cracker crumbs instead of chocolate cookies for a lighter crust. If you prefer a little extra texture, use crunchy peanut butter. For the topping, crushed peanut butter cookies, mini chocolate chips, or a drizzle of melted chocolate all work well.
Step-by-Step Instructions to Make No-Bake Peanut Butter Pie
Step 1: Make the crust
Combine the cookie crumbs with melted butter until the mixture looks like damp sand. Press it firmly into the bottom and sides of a pie dish, then chill while you make the filling.
Step 2: Mix the filling
In a large bowl, beat the cream cheese until smooth. Add the peanut butter, powdered sugar, and alcohol-free vanilla extract, then mix until creamy and well blended.
Step 3: Fold in the whipped topping
Gently fold the whipped topping into the peanut butter mixture until the filling is light and fluffy. If it seems too thick, add a small splash of milk to loosen it slightly.
Step 4: Fill and chill
Spoon the filling into the prepared crust and smooth the top. Cover the pie and chill it for at least 4 hours, or until fully set.
Step 5: Add the finishing touch
Just before serving, top the pie with chocolate shavings, chopped peanuts, or another garnish you love. Slice and enjoy cold.
Tips for Success
Soften the cream cheese before mixing, this helps keep the filling silky and lump-free. Also, make sure the crust is packed down well so it holds together when sliced.
If you want cleaner slices, chill the pie overnight. A sharp knife wiped clean between cuts also makes serving much easier.
Variations of No-Bake Peanut Butter Pie
Try a chocolate cookie crust for a deeper, richer flavor, or use a graham crust if you want something a little lighter. You can also swirl melted chocolate into the filling for a marbled look.
For a fun picnic version, top each slice with crushed cookies, chopped peanuts, or a spoonful of whipped topping. If you like a saltier-sweet contrast, sprinkle a pinch of flaky salt over the finished pie.
Serving Suggestions: What to Pair with No-Bake Peanut Butter Pie
This pie pairs beautifully with fresh berries, iced coffee, or a cold glass of milk. It also makes a lovely finish after grilled mains, picnic sandwiches, or a simple summer salad.
If you are serving a crowd, add a bowl of sliced strawberries or banana coins on the side. They balance the richness of the filling and make the dessert feel extra special.
Storage & Reheating Instructions
Store leftover pie covered in the refrigerator for up to 4 days. Keep it chilled until ready to serve, since the filling is best cold and firm.
This dessert does not need reheating. If you want to freeze it, wrap it well and freeze for up to 1 month, then thaw in the refrigerator before serving.
Memories Made Around the Table
There is something about a chilled pie at the end of a picnic meal that always feels nostalgic. It brings people together, gives everyone a reason to linger, and somehow makes an ordinary afternoon feel like a celebration.
FAQs
Can I make this pie ahead of time?
Yes, this pie is ideal for making ahead. In fact, chilling it overnight can improve the texture and make slicing easier.
Can I use natural peanut butter?
You can, but the texture may be softer and a little less stable. For the creamiest, firmest filling, a regular creamy peanut butter works best.
How do I keep the crust from crumbling?
Mix the crumbs with enough melted butter so they hold together when pressed. Packing the crust firmly into the pan also helps it stay neat when sliced.
Can I make this without whipped topping?
You can use homemade whipped cream if you prefer. Just whip it to soft peaks and fold it in gently so the filling stays light.
Final Thoughts
This no-bake peanut butter pie is the kind of dessert that feels easy enough for a weeknight, yet special enough for a picnic or celebration. With its creamy filling and chilled, sliceable texture, it is one of those recipes people remember and ask for again.