

I truly adore the magic that fills the kitchen during the holiday season, especially when I get to create treats that look as good as they taste. These Christmas Tree Oreos have become a staple in my home because they are incredibly simple to put together and always bring a smile to everyone’s face. I love how the bright green colors and festive sprinkles make any dessert table feel instantly more joyful, and I always make sure to keep a few aside for myself before they all disappear.
Recipe Details
Recipe Information
- Prep Time: 20 minutes
- Cook Time: 0 minutes
- Total Time: 50 minutes
- Servings: 12
- Difficulty: Easy
Nutrition Information (Per Serving)
- Calories: 165
- Protein: 1.5 grams
- Carbs: 22 grams
- Fat: 8 grams
Why You’ll Love This Christmas Tree Oreos
This recipe is a holiday winner because it requires absolutely no baking, making it perfect for busy December afternoons. The combination of crunchy chocolate cookies and sweet candy coating is a classic crowd-pleaser that appeals to both children and adults. Since they are so easy to assemble, they are a fantastic project for getting the whole family involved in the kitchen. Plus, they are sturdy enough to be wrapped in cellophane bags and given away as adorable homemade gifts for neighbors and teachers.
Christmas Tree Oreos Ingredients & Substitutions
- 12 chocolate sandwich cookies, such as Oreos
- 12 small pretzel sticks
- 1 cup green candy melts
- 1 teaspoon coconut oil or vegetable shortening
- 2 tablespoons holiday themed sprinkles
- 12 small yellow star sprinkles
- 1 teaspoon alcohol-free vanilla extract, optional for flavor
If you cannot find green candy melts, you can use high-quality white chocolate bars melted with a drop of green gel food coloring. Avoid liquid food coloring as it can cause the chocolate to seize and become grainy. You can substitute the pretzel sticks with lollipop sticks or even small pieces of candy canes for a different look. Any variety of sandwich cookie will work, so feel free to experiment with golden or peanut butter filled versions to change the flavor profile.
Step-by-Step Instructions to Make Christmas Tree Oreos
Step 1: Prepare Your Workspace
Line a large baking sheet with parchment paper or a silicone baking mat. This ensures that your decorated cookies will not stick as they set. Gather all your sprinkles, stars, and pretzel sticks so they are within easy reach, as you will need to work quickly before the chocolate hardens.
Step 2: Prepare the Cookie Trunks
Gently twist each sandwich cookie apart to separate the two chocolate wafers. Press one pretzel stick into the cream filling of one wafer, leaving about half of the pretzel sticking out of the bottom to act as the tree trunk. If the cream is too firm, you can add a small dot of melted chocolate to help it stick. Carefully press the second wafer back on top to reform the sandwich.
Step 3: Melt the Coating
Place the green candy melts and coconut oil in a microwave-safe bowl. Heat in 30-second intervals, stirring thoroughly between each session, until the mixture is completely smooth and glossy. If you are using alcohol-free vanilla extract, stir it in once the chocolate is melted. The oil helps create a thinner, more dip-friendly consistency that coats the cookies evenly.
Step 4: Dip the Cookies
Hold a cookie by the pretzel trunk and dip it halfway or fully into the green melted chocolate. Use a spoon to help pour the chocolate over the top if needed. Gently tap the pretzel against the side of the bowl to allow excess chocolate to drip off. Place the coated cookie onto the prepared parchment paper.
Step 5: Decorate and Set
While the green coating is still wet, place a yellow star sprinkle at the very top of the cookie. Shake a few festive sprinkles over the rest of the green surface to look like ornaments and lights. Repeat this for all cookies. Allow them to sit at room temperature for about 30 minutes, or place the tray in the refrigerator for 15 minutes until the chocolate is firm and set.
Tips for Success
To get the smoothest finish, make sure your bowl is completely dry before adding the candy melts, as even a drop of water can ruin the texture. If your chocolate starts to thicken while you are dipping, just pop it back into the microwave for ten seconds to loosen it up. When pressing the cookies back together, do it gently to avoid cracking the chocolate wafers. If a cookie does break, don’t worry, the melted chocolate coating will act like glue and hide most imperfections once it sets.
Variations of Christmas Tree Oreos
For a snowy look, you can drizzle white chocolate over the finished green trees to simulate snow on branches. You can also use different flavors of Oreos, such as mint or double stuffed, to add a surprise element to every bite. If you want a more rustic tree, use a fork to drag texture through the wet chocolate before adding sprinkles. For those who enjoy a salty and sweet mix, try crushed pretzels on top instead of traditional sugar sprinkles.
Serving Suggestions: What to Pair with Christmas Tree Oreos
These treats are wonderful when served alongside a warm mug of cocoa or a cold glass of milk. They make a beautiful addition to a holiday charcuterie board filled with nuts, fruits, and other festive sweets. If you are hosting a party, try arranging them on a platter with a dusting of powdered sugar to look like fallen snow. They also look great when used as edible toppers for a large holiday cake or a batch of cupcakes.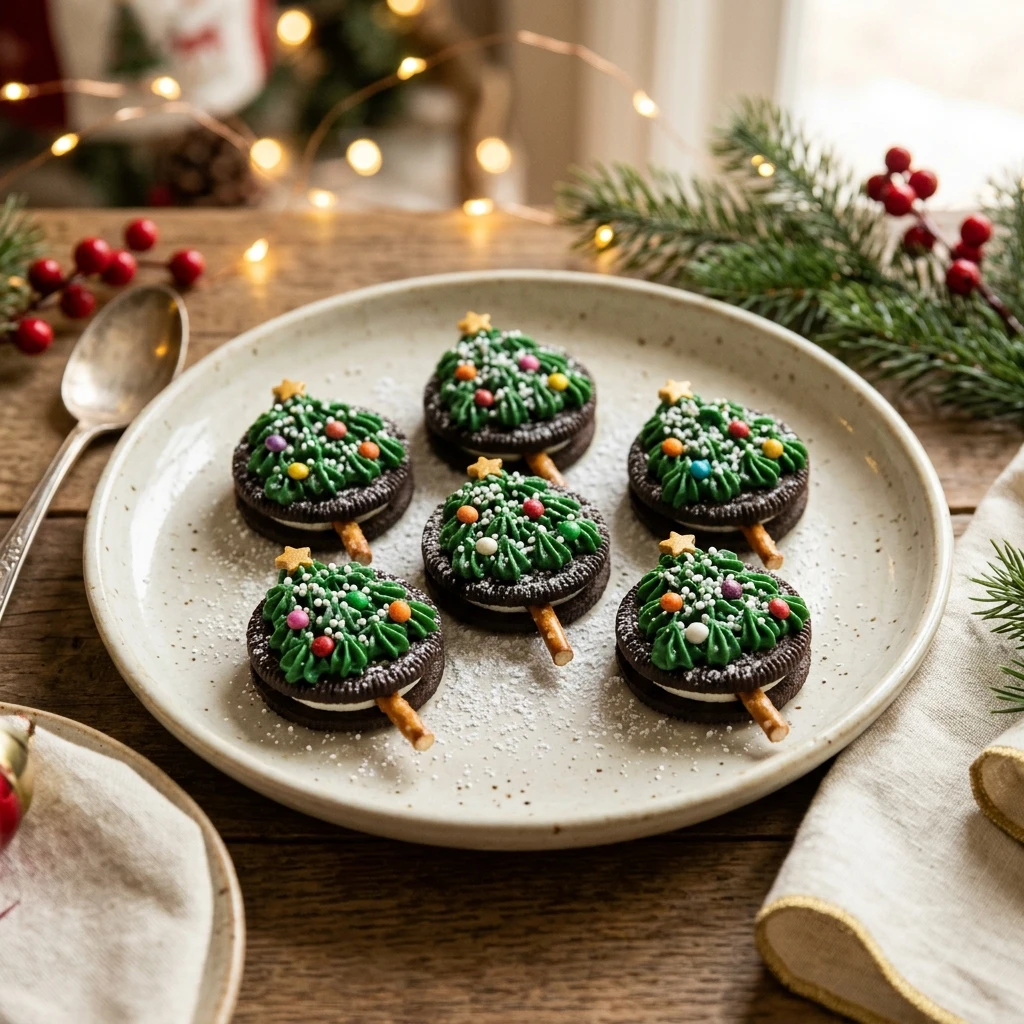
Storage & Reheating Instructions
Store your finished cookies in an airtight container at room temperature for up to two weeks. Keep them in a cool, dry place away from direct sunlight to prevent the chocolate from softening or blooming. If your kitchen is particularly warm, you can store them in the refrigerator, but let them come to room temperature before serving for the best flavor. These do not require reheating, as they are meant to be enjoyed as a crisp and cool confection.
Memories Made Around the Table
One of my favorite memories is sitting at the small kitchen table with my nieces, each of us covered in green chocolate and colorful sprinkles. We laughed so hard trying to get the star sprinkles perfectly straight on top of the trees while Christmas music played in the background. It is moments like those that remind me why holiday baking is so special. Every time I see a green Oreo, I am transported back to that afternoon of messy fun and holiday cheer.
FAQs
Can I make these in advance?
Yes, these are excellent for making ahead of time. You can prepare them several days before your event and store them in a cool spot. They stay fresh and crunchy for a long time, which helps take the stress out of holiday party planning.
What is the best way to melt the chocolate?
The microwave method is the fastest, but you can also use a double boiler if you prefer. Just ensure the water in the bottom pot is simmering and not boiling, and keep the top bowl from touching the water to prevent overheating the candy melts.
Can I use regular liquid food coloring?
It is best to avoid liquid food coloring because it contains water, which causes chocolate to seize and turn into a paste. Always use gel-based or oil-based food coloring if you are starting with white chocolate to ensure a smooth and creamy result.
How do I prevent the pretzel from falling out?
If the cream inside the Oreo is not holding the pretzel stick securely, dip the end of the pretzel in a little bit of melted chocolate before pressing it into the cookie. This acts as a strong edible glue that will keep the trunk in place once it hardens.
Do these need to be refrigerated?
While they do not strictly require refrigeration, it can help the chocolate set faster. If you live in a very warm climate, keeping them in the fridge will prevent the chocolate from melting, but otherwise, a cool pantry is perfectly fine for storage.
Final Thoughts
These Christmas Tree Oreos are more than just a sweet snack, they are a way to bring people together during the most wonderful time of the year. Whether you are making them for a school party, a gift exchange, or a family gathering, they are sure to be a hit. The simplicity of the process allows you to focus on the joy of creating something beautiful. Happy holiday baking to you and your loved ones, and may your season be filled with sweetness.


Christmas Tree Oreos
- Total Time: 50 minutes
Ingredients
- 12 chocolate sandwich cookies, such as Oreos
- 12 small pretzel sticks
- 1 cup green candy melts
- 1 teaspoon coconut oil or vegetable shortening
- 2 tablespoons holiday themed sprinkles
- 12 small yellow star sprinkles
- 1 teaspoon alcohol-free vanilla extract, optional for flavor
Instructions
- Line a large baking sheet with parchment paper or a silicone baking mat. This ensures that your decorated cookies will not stick as they set. Gather all your sprinkles, stars, and pretzel sticks so they are within easy reach, as you will need to work quickly before the chocolate hardens.
- Gently twist each sandwich cookie apart to separate the two chocolate wafers. Press one pretzel stick into the cream filling of one wafer, leaving about half of the pretzel sticking out of the bottom to act as the tree trunk. If the cream is too firm, you can add a small dot of melted chocolate to help it stick. Carefully press the second wafer back on top to reform the sandwich.
- Place the green candy melts and coconut oil in a microwave-safe bowl. Heat in 30-second intervals, stirring thoroughly between each session, until the mixture is completely smooth and glossy. If you are using alcohol-free vanilla extract, stir it in once the chocolate is melted. The oil helps create a thinner, more dip-friendly consistency that coats the cookies evenly.
- Hold a cookie by the pretzel trunk and dip it halfway or fully into the green melted chocolate. Use a spoon to help pour the chocolate over the top if needed. Gently tap the pretzel against the side of the bowl to allow excess chocolate to drip off. Place the coated cookie onto the prepared parchment paper.
- While the green coating is still wet, place a yellow star sprinkle at the very top of the cookie. Shake a few festive sprinkles over the rest of the green surface to look like ornaments and lights. Repeat this for all cookies. Allow them to sit at room temperature for about 30 minutes, or place the tray in the refrigerator for 15 minutes until the chocolate is firm and set.
- Cook Time: 50 minutes
- Diet: Vegetarian